
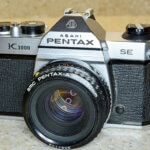
Most cameras use an internal light meter to set aperture and/or shutter speed. But what if you are using a film camera from the 1970s that does not have a light meter? You have to get used to shooting without a light meter. How to determine the correct exposure? Let me explain what my journey has been to overcome this.
Using your camera’s light meter
First, let’s start off with the most common case that is encountered in modern cameras. When your camera has an internal light meter, you will be able to read the light meter through the view finder. When working in full manual mode (i.e. both aperture and shutter speed are set manually by yourself), the light meter indicates over- and under exposure. Adjusting either aperture or shutter speed will eventually result in correct exposure.
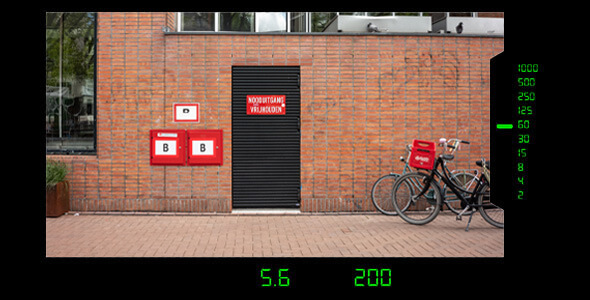
When working in aperture priority, you set the aperture yourself and the camera selects an appropriate shutter speed for correct exposure. In this case the light meter will show the shutter speed selected. You have to judge yourself if the selected shutter speed is appropriate for your subject. For instance when the camera selects 1/15s as shutter speed, but you want to freeze a driving car in motion, this is clearly not the correct shutter speed. This means you will have to increase the aperture by one or more stops, which will result in a shorter shutter speed.
Using an external light meter
An external light meter is a light meter that is used separately from your camera. Typically you set the ISO value of your film on the light meter and the aperture you want to use. The external light meter then gives you the shutter speed that will achieve correct exposure. In the same way, you can set the required shutter speed and the light meter will give you the aperture value that will result in correct exposure.
Both aperture and shutter speed are then set manually on the camera.
Incident meters
Incident meters are placed very near to the subject, with the white dome on the meter pointing towards the camera. Then take a reading. These meters are called incident meters as they measure the amount of light that falls onto the subject. Incident meters are often combined into one device with a reflective meter.
Reflective meters
Reflective meters read the light that is reflected by the subject onto the light meter. They do not require to be near to the subject and are therefore more practical. The light meter in your camera is also a reflective meter. To use an external reflective light meter, point it to your subject without the white dome covering the meter. Then take a reading.

Spot meters
Spot meters are a special kind of reflective meters, which measure the light in a more tight angle of view. It does not evaluate the whole scene, but only a small part of it (the ‘spot’). Usually, there is some kind of view finder that you look through to point the meter at the spot you want to evaluate.
Hot shoe meters
Hot shoe meters have been introduced with the popularity of film photography started to rise again. Hot shoe meters are reflective meters that are place in the hot shoe of your camera. Wherever you point your camera, you can take a reading. They work in the same way as traditional meters in the sense that you set the ISO and aperture and the meter provides the appropriate shutter speed. Hot shoe meters can be very small and lightweight and are therefore very practical in use.


As a last option, a number of phone apps have become available that take advantage of the camera on your phone to meter the light. The advantage that you can meter light with a device that you will always have already with you. There are many available and some work better than others. As an iPhone user I have good experience with the Lux app and the Lumu Light Meter app (I have no relationship with the makers of these apps), but I encourage you to try a few. Many are free of charge.
Using no light meter at all
There are many cameras that do not have an internal light meter at all. My first Leica was a Leica M4-P. A camera without a light meter. This means that you may have to turn to an external light meter. But, you may experience external light meters to be cumbersome and making you miss the shot. It is what my experience was when using an external light meter. Fortunately, there is the Sunny 16 rule.
The Sunny 16 rule states that your shutter speed is determined by the ISO value of your film. The shutter speed is the inverse of the ISO value. So, when you use an ISO 100 film, your shutter speed should be 1/100s or the nearest value. As film cameras do not support 1/100s, use 1/125s as the shutter speed. Aperture is then determined by the weather conditions.
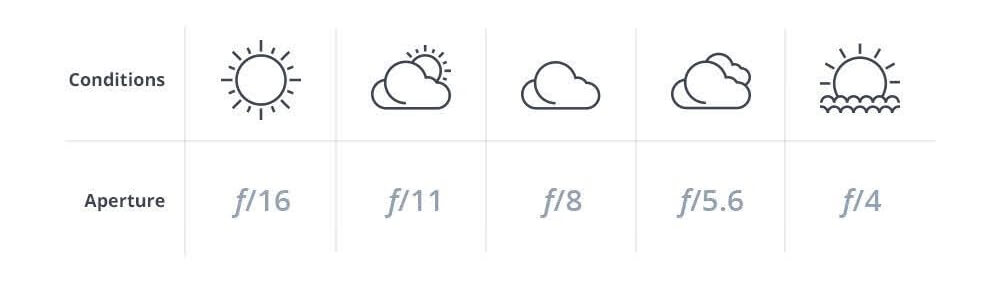
- When it is a sunny day with no clouds, use f/16 (this is the reason it is called Sunny 16).
- When there are some clouds, but it is still sunny, use f/11.
- When it is completely overcast, but with shadows still visible, use f/8.
- When it is heavily overcast with no visible shadows, use f/5.6.
- Also use f/5.6 for backlit subjects.
- When the sun is setting at dusk, use f/4.
Of course when you have determined correct exposure you can start increasing / decreasing aperture stops where you find necessary, as long as you adjust the shutter speed accordingly.
Sunny 16 requires some practice and you will get it wrong. But I have found it very useful and quick to apply. It saves time of taking a reading and does not require you to carry another device in a camera bag that may have already been fully packed.
The zone system
The zone system was described by Ansel Adams and primarily aimed at black and white photography. Ansel Adams described the zone system at length in his book The Negative and I am not going to try to repeat that in this context. But I will provide you with a brief description, which may inspire you to read more about it.
The zone system is based on the notion that light meters measure for middle grey like an 18% grey card. This results in an image where white is not really white and black not really black.
Ansel Adams therefore defined 10 zones of light, each with one stop difference, zone V being the middle grey. Zone III is where the darkest tone with detail is. Zone VII is where the lightest tone with texture is. Zone II is almost black and Zone VIII is almost paper white.
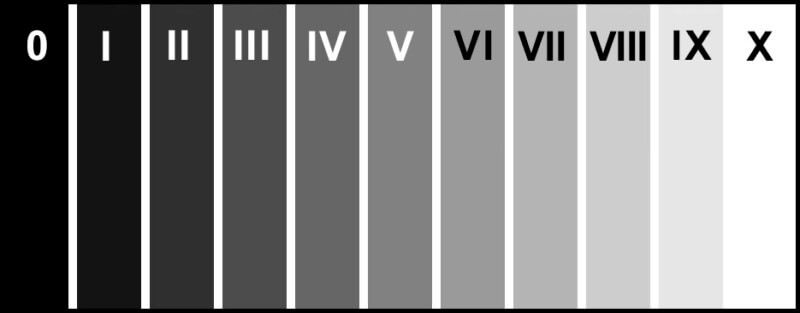
When taking a picture, you measure the brightest and darkest spots of your image. A light meter will measure for middle grey, which needs to be corrected. The brightest spot therefore needs to be promoted to for instance zone VII or VIII, which means a 2 or 3 stop increase in exposure. The darkest spot needs be demoted to for instance zone III or IV, which means a 1or 2 stop decrease in exposure. All depending on what you want the resulting image to look like. This is called pre-visualisation.
Using this technique, you can determine the correct exposure for your image. For further information, I recommend reading an article on PetaPixel that provides a good explanation of the Zone System (https://petapixel.com/how-to-use-the-zone-system/) or of course the book by Ansel Adams himself.
Leave a Reply